


Repairing Your Inflatable Boat: Do it once, do it right!
There are many advantages to owning an inflatable boat: they are very portable, they are lightweight, incredibly stable, super safe and perfect for many applications like fishing, diving, exploring or use as a tender for a larger boat. However, if you are using the boat hard, there is always a chance you are going to do a repair at some stage.
Repairs done properly should last the lifetime of the boat; repairs that aren't done correctly are likely to come apart the next time you use the boat. In this article, we go over how we repair True Kit inflatable boats in our workshop.
It is worth noting that our True Kit boats are made from a fabric called Valmex® made by the German company Mehler. Valmex is a premium-quality PVC-coated fabric. The first thing you need to determine is what your inflatable boat is made of, and match how you repair the boat to that fabric.
Preparing The Right Equipment
As with most jobs, the preparation is very important. First, you need to assemble all the right equipment:
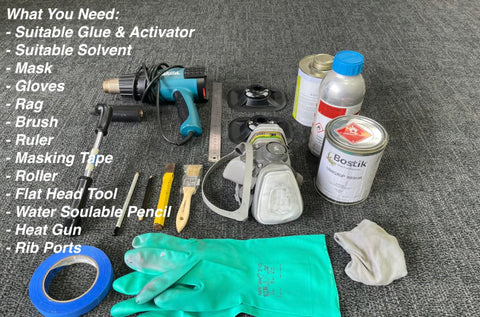
This list might include:
- Suitable 2-pot glue (the second part being the activator/crosslinker) - Bostik Unigrip 999HR with Desmodur RFE used at 10%
- Suitable solvent (MEK in our case)
- Mask
- Gloves
- Masking Tape
- Rag
- Brush
- Ruler
- Knife
- Roller or other tool to work the two surfaces together
- Water-soluble pencil
- Heat Gun
- Repair fabric
Step 1 - Identify the Area That Needs Repair
This may sound simple, but often a hole can be very small and not easy to find. We use a spray bottle with a mixture of water and dishwashing liquid. Always spray a much larger area than where you think the hole might be, as often there will be a second hole you haven't spotted.
Note that very small repairs can be done with the boat inflated (also the way you would follow these instructions to add an extra fitting onto a boat), if the repair is large, you will want to do it with the boat in a DEFLATED state. This will stop back-pressure from pushing the patch off.

Step 2: Do the Cutting
Cut out some suitable-sized patches using the same fabric that your boat is made from. As a rule of thumb, try to have 25mm or 1 inch of patch cover outside the area needing repair.
Step 3: Trace the Patches
Use the water-soluble pencil to trace around the patch. This gives you the exact area that needs to be masked off for glue application.

Step 4: Tape The Masks
Using the masking tape, accurately mask around the pencil outline
Step 5: Clean The Surfaces
Clean both surfaces using the rag and the MEK solvent. This cleans and primes the surface for the glue

Step 6: Mix the Glue and Activator
Thoroughly mix the 2 parts of glue according to the instructions that come with the glue you have. With the products that we use, we mix at a ratio of 10% activator. Allow a few minutes for the glue and activator to combine.
Step 7: Apply the Glue
Take the small paintbrush and cut the bristles to around half their length. This makes the brush bristles stiffer and allows you to apply the glue more evenly over the surfaces.
Step 8: Re-apply Glue
Use the cut-down paint brush to apply an even layer of the glue to both surfaces. Some glue products call for more than one application of the glue. In all cases, with a contact adhesive, you want to leave the glue to tack off. This is typically around 15 minutes, but it depends on the temperature. To check the surface is not sticky, you never want to use your fingertips. Instead, you can use the knuckle side of your fingers or, better still and gloved hand.
Step 9: Dry the Surfaces Up
As our glues are heat-activated, we now use the heat gun (a hair dryer can also be used) to warm both surfaces up. Only a modest heat is applied, something that your hand could handle. This heat reactivates the glue and makes it ready to bond together.

Step 10 Remove the Masking Tape & Place the Patches
Remove the masking tape and carefully place the patch onto the marked area on the boat. Then use the roller or other hard tool to apply pressure to the patch. This is an important step to amalgamate the two surfaces of the glue together.
Step 11 Allow It to Dry for 2 Days
Allow 48 hours before pumping the boat up to full pressure. You can retest the boat using the soapy water again. Enjoy using your boat again!
Note: This step-by-step instruction is what we at True Kit use for our type of boats. These steps may not apply if you have a different brand of boat.
Suggested Reading:
Your Step-by-Step Guide to Inflatable Dinghy Repair


